I wanted to give my iPhone 3G, which I had previously jailbroken and unlocked, to a friend. So naturally, I went into Settings, General, Reset, and selected “Erase All Content and Settings”. Bad mistake. After reboot, the iPhone was stuck in recovery mode.
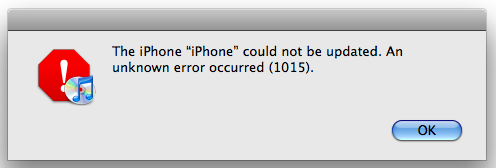
Worse mistake. I then plugged the iPhone into my Macbook Pro and did an iOS 4.2.1 restore using iTunes. I was thinking that I would just redo the jailbreak. Unfortunately, the iTunes restore failed with an error 1015. I found that I still had the custom PwnageTool iOS 4.2.1 ipsw firmware image I had used previously. I re-attempted the restore, this time holding the Option key while clicking on Restore so I could browse for and select my custom ipsw image file. This time, I got an error 1016.

After hours of googling, experiments (where I got other errors like 1600), and reading my own posts on the subject (I had forgotten everything), I found the answer. It turns out that the previous jailbreak I used was an tethered jailbreak; meaning that if I rebooted the iPhone, I would have to connect it to the computer and do something. In this scenario, that something would probably be to run a tool like TinyUmbrella to kick the iPhone out of recovery mode.
FYI: Per some instructions I found on the web, I did the restore again, left iTunes displaying the error 1015 dialog, ran TinyUmbrella to get the iPhone to “exit recovery” mode, and waited for the iPhone to reboot. Unfortunately, this method did not work and the iPhone promptly booted back into recovery mode. (TinyUmbrella also offered a “fix recovery” function which I tried; whatever it did, it didn’t fix my issue.)
The iTunes restore error was caused by the updated 06.15.00 baseband version (I had updated the baseband to get the unlocking tool, UltraSn0w, to work). iTunes did not recognize this baseband version and thus, threw a 1015 error. (I have no idea what the 1016 error is about though.)
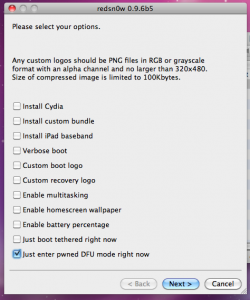
 The correct solution was to run RedSn0w to put the iPhone into a special “pwned” DFU mode which would accept custom ipsw firmware images and then to do the iTunes restore. This Youtube video, How to: Fix ERROR 1015 iPhone 3G STUCK ITUNES-STEP BY STEP!, contains the instructions. Basically run any version of RedSn0w 0.9.6 (I used the 0.9.6b5 version I had from my last jailbreak) and in the options screen, select only the “Just enter pwned DFU mode right now”. RedSn0w will walk you through putting the iPhone into that special DFU mode.
Hint: To get into DFU mode, leave the iPhone connected to the computer by USB cable. Turn the iPhone off first. If you can’t get to the shutdown slider, you can force an iPhone to turn off by holding both the power and home buttons until the screen goes dark (about 3-5 seconds). DFU mode is entered by holding the power button for 3 seconds, both power and home buttons for 10 seconds, and the home button for 15 seconds. If you have trouble getting into DFU mode and end up in recovery mode, use TinyUmbrella to exit recovery mode and try again.
Once RedSn0w is done, RedSn0w will tell you to quit it and run iTunes to do the restore. Rather than using my previous custom iOS 4.2.1 ipsw firmware image, I decided to create a new one using PwnageTool 4.2. PwnageTool 4.2 is an updated version which can do an untethered jailbreak. With an untethered jailbreak, when the iPhone is rebooted, it should just start up like normal, instead of entering recovery mode.
To create the new ipsw firmware image, I managed to download PwnageTool 4.2 from one of the working mirror links (specifically the 4th one) hosted on this page, PwnageTool 4.2 For Mac: iOS 4.2.1 Untethered Jailbreak For iPhone, iPad, iPod Touch & Apple TV 2G Released; Fixes iBooks Problem.
I then followed the excellent instructions from How To Jailbreak & Unlock iPhone 4, 3GS & 3G On iOS 4.2.1 Using PwnageTool 4.2. I only followed the steps up to 10. I did not do steps 11 and after because they are replaced with the RedSn0w “pwned” DFU mode steps above and iTunes restore steps below.
After putting the iPhone into “pwned” DFU mode and quitting redSnOw, I started iTunes and it recognized the iPhone 3G in recovery mode. I then held down the Option key while clicking on Restore to browse for the new PwnageTool 4.2 custom iOS 4.2.1 image that I had created above.
This time, the restore proceeded to completion, without the dreaded error 1015. It took almost 10 minutes before my iPhone 3G booted up and showed me the normal home screen. I then ran Cydia, updated it, searched for and installed ultraSn0w to do the unlock. I popped in the T-Mobile SIM card and checked that the phone calling and texting were working.
Hopefully if you encounter the above, you won’t have to do so much research to resolve the issue.

Thanks!!!!!
It won’t go to dfu mode.
Hi runing. It may be my text instructions are not too clear. There are youtube videos that might help you put the device into DFU mode; here is a good one, How To – DFU Mode. Regards.
Thank you for your simple and outstanding steps…I have been struggling for days and this really worked for me .
Thank you so much. Instructions were very clear and most importantly…it worked!
Can u please create a custom 4.2.1 fw for 3g because i dont have mac… And i am also stuck in same problem..
Hi Dharmesh,
Unfortunately, the page that I used before with instructions for PwnageTool is kaput. It’s been so long that I don’t remember much of anything. I thought you could use RedSn0w, which runs on Windows, but it looks like you will still need PwnageTool to create a custom image. I found this post, Jailbreak and unlock iOS 4.2.1 with redsn0w 0.9.6b5, which has a comment similar to yours. Perhaps one of the replies will offer you a hint or solution.
Good luck!
Chanh